


- Windows Guest Account
- OPTION 1: Use the command line to create a guest account in "Windows 10"
- OPTION 2: Add a guest account in "Windows 10" through "Local Users and Groups"
Read how to add a guest account to Windows 10 , how to properly configure and create restrictions . Windows 10 no longer offers a guest account for sharing your personal computer, but you can create a limited account to emulate this feature.  Content:
- Guest account in Windows.
- How to create guest account restrictions:
Windows Guest Account
The developers of the Windows operating system tried to expand its capabilities and unify them for use on various types of devices. Earlier versions of “Windows” allowed it to be used for sharing by multiple users on a single personal computer or laptop. This was achieved by creating a guest user account.
There may be different situations when you need fast access to a computer, and this opportunity allows you to expand the level of use of personal computers. The concept of a guest account provides a local temporary opportunity for a third-party user to use your personal computer to perform a limited set of actions, such as accessing the Internet, launching certain applications, creating and editing documents, etc.
However, the ability to perform certain actions on your personal computer did not allow the user who logged in under the guest account to access your personal files and folders ( “Documents” , “Music” , “Images” , etc.), to install or delete any applications or programs, install or update drivers and additional equipment, change the preset system settings, open applications from the Microsoft Store, etc. In other words, the user, while working on your computer under a guest account, did not have access to personal computer management tools and the “Windows” system settings as a whole. Thus, your system was completely safe. Unfortunately, after the release of the operating system "Windows 10" , the ability to create a guest account has disappeared.
You can enable it in several ways, but the guest account is not displayed for use. In fact, even if you manage to enable such an account, it may not even appear on the login screen.
However, the elements necessary to create a guest account are still present in the Windows 10 operating system, which allows you to create your own limited account so that guests can use it on your computer. It just takes a little more of your time.
In this guide, we will show two options for creating a limited guest user account on your personal computer.
OPTION 1: Use the command line to create a guest account in "Windows 10"
As the name suggests, in the first version we will use the command line features. This option is universal and suitable for any version of the operating system "Windows 10" . The command window can be called up in several ways. However, you need to open a command line application with administrator privileges to create a guest account. In this case, you can use any proposed method described below, which seems to you the most convenient.
So, open a command prompt window with administrator rights in any way to choose from:
Method 1 : Press the "Windows + X" key combination together or right-click on the "Start" button located in the lower left corner of the desktop in the "Taskbar" and open the pop-up menu. From the list of available applications, select the “Windows PowerShell (administrator)” section (In various editions of the “Windows 10” operating system, there may be a “Command line (administrator)” section .)
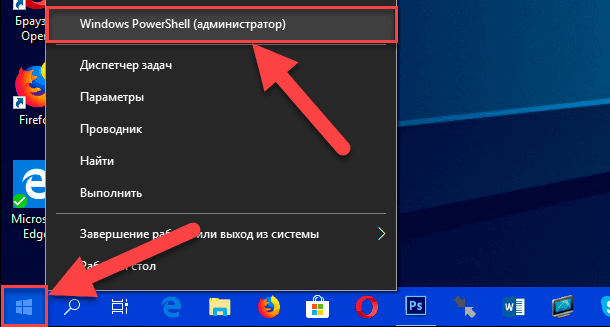
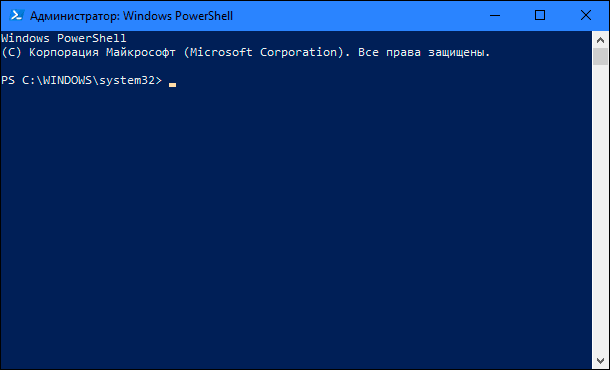
The Windows PowerShell (Administrator) application will open, performing command-line functions in later editions of the Windows 10 operating system.
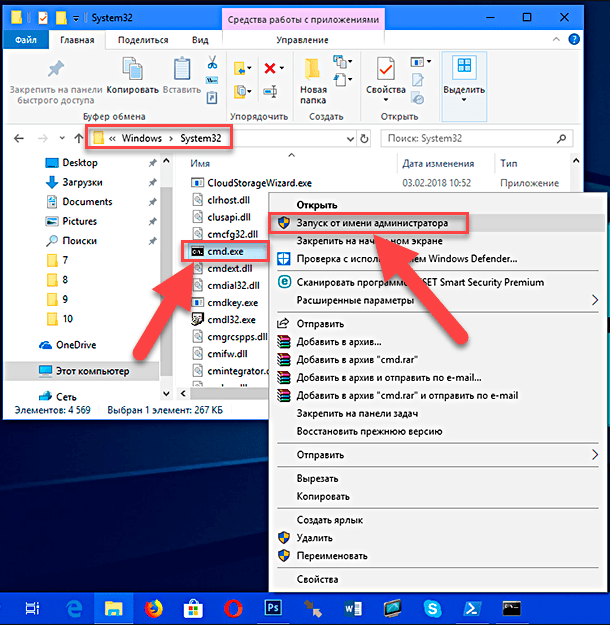
Method 2 : You can open the command line application by referring directly to the executable file "cmd.exe" , which is located on the system drive "C" in the following directory:
"C: \ Windows \ System32"
Enter the specified directory, lower the scroll bar and find the required Windows command handler file. Right-click on it and open a pop-up menu. From the list of possible actions, select the “Run as administrator” section .
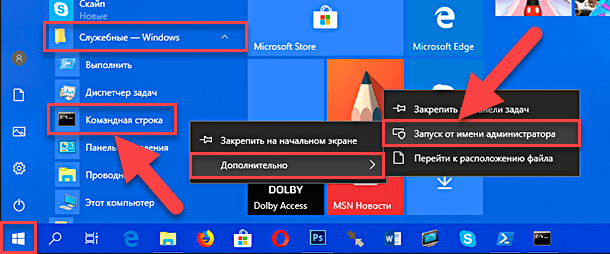
Method 3 : Click on the "Taskbar" in the lower left corner of the desktop "Start" button to open the main user menu "Windows" . In the list of installed applications and programs using the scroll bar, lower the slider down to the "System Tools - Windows" section . Open the submenu and in the list of service applications find the section "Command line" . Click on it with the right mouse button and in the pop-up menu, find the "Advanced" section. When you hover the cursor over a section, the following submenu will open, in which select the section “Run as administrator” .
Method 4 : On the "Taskbar" next to the "Start" button in the lower left corner of the screen, select the "Search" button. In the opened application panel in the required place, enter the search query “cmd” . After entering the query in the best matching cell, the application “Command line. Classic application . Right-click on it to open a pop-up menu and select the "Run as administrator" section .
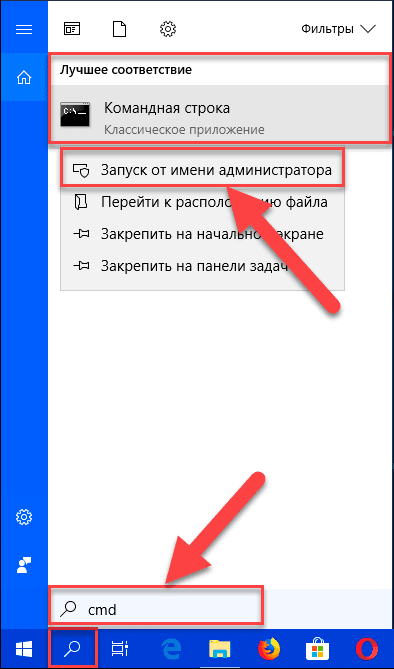
The Windows User Account Control Service will give a question warning message: “Allow this application to make changes on your device?” . Click "Yes" to confirm your actions and open a command prompt with administrator rights.

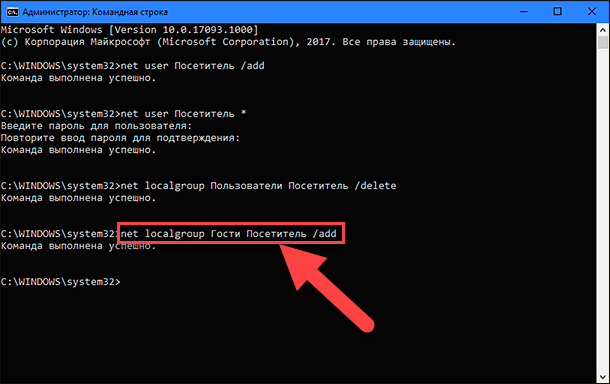
In the command line field, enter the following command to create a new account and press the "Enter" key on the keyboard:
net user Visitor / add
As a result, you should receive the message "The command completed successfully." , Meaning the creation of a new account.
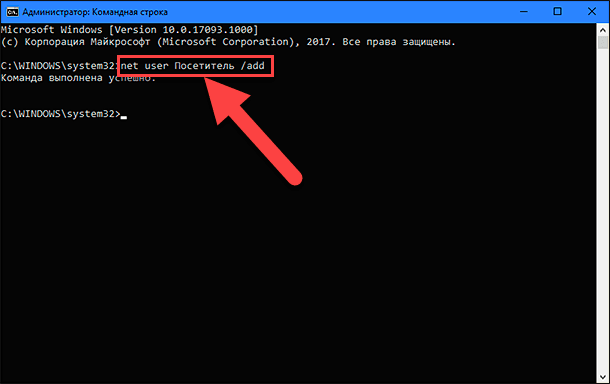
Note : Please note that we use the name "Visitor" as the name of the new account, because the name "Guest" (Guest) is the reserved name of the operating system "Windows 10" , and you will not be able to use it. However, you can name your account by any other name that you like best or will give you a complete picture of the possibilities of a new account. Just try to choose a name that is not too long and informative, so as not to complicate your work at each logon under that name.
Now enter the following command to set the password for the newly created account and press the “Enter” key on the keyboard:
net user Visitor *
You do not need to set a password for this account, so just press the Enter key twice to leave the place where the password was created is empty.
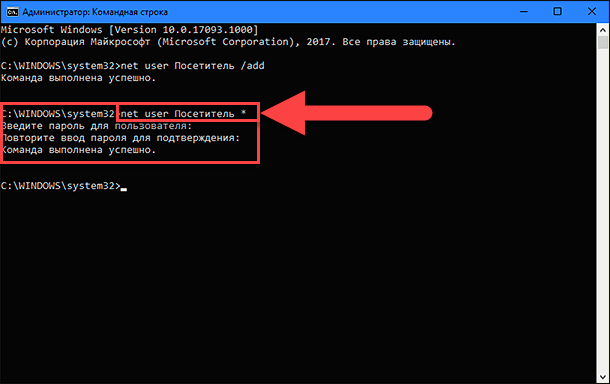
If all actions were performed correctly, then you will see a confirmation message “The command completed successfully.” .
A new user account was created by default in the local user group. Therefore, you need to remove it from this group using the following command and pressing the Enter key to execute:
net localgroup Users Visitor / delete
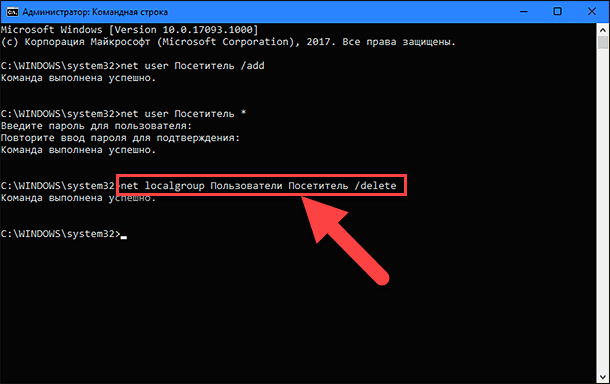
In this command, the "Users" parameter indicates a local group, and "Visitor" - the name of the account that we remove from this group. If you are using the English version of the Windows operating system, then replace the Users option with users .
Enter the following command to add the new user account “Visitor” to the “Guests” group and press the “Enter” key on the keyboard:
net localgroup Guests Visitor / add
The parameters of the group and the user account are entered by analogy with the previous command. Accordingly, in the English version of the operating system “Windows” , replace the parameter “Guests” with “guests” .
Close the command prompt window to complete the task.
Using the steps above, you create a traditional standard user account. But removing it from the local Users group and adding it to the Guests group , you assign to it the same functions and permissions that were available in the old version of the guest account.
Once you have completed the steps described, you will only need to log out of your current account. Then, on the login screen, select the “Visitor” account and click the “Login” button - no password is required because we did not set it when creating this account.
Now you can provide an opportunity for third-party users to log into your personal computer under the new Visitor guest account. They will be able to access the Internet and use certain applications and programs. You may not be afraid that third-party users may access your personal information, install or uninstall programs and applications, or make any changes to the configuration of the “Windows” operating system.
In the event that you no longer need this account, you can easily remove it from the Settings application. The Settings application combines all the basic functions of managing the operating system and is intended to replace the Control Panel application in earlier versions of Windows . The developers of the Windows operating system took care of the availability of various ways of accessing the Parameters application. We will show a few of them so that we can choose the most appropriate way for you.
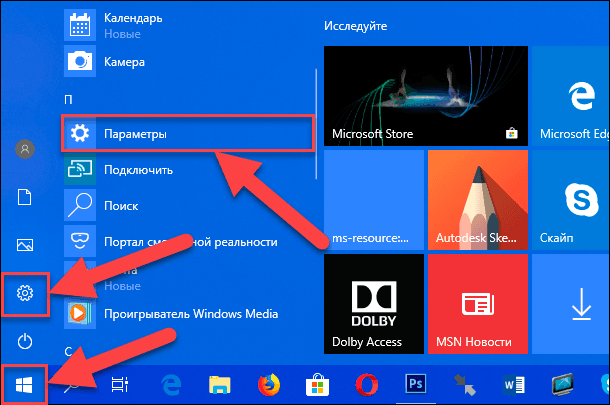
Method 1 : Click on the "Start" button in the lower left corner of the screen on the "Taskbar" and open the main user menu "Windows" . In the left pane of the menu, click on the gear icon and open the Settings app. Or, using the scroll bar, move the slider down and select the "Parameters" section from the list of installed applications and programs.
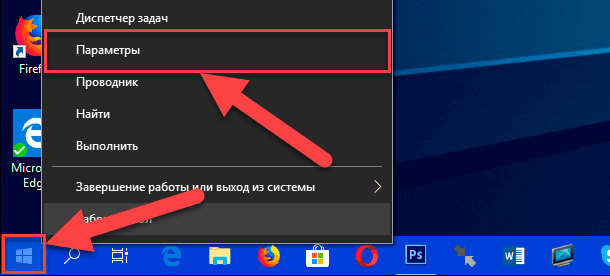
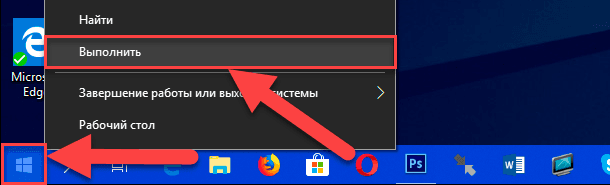
Method 2 : Right-click on the "Start" button in the lower left corner of the desktop, or press the "Windows + X" key combination and bring up a pop-up menu. In the list of available applications, select the "Options" section.
Method 3 : The fastest way to open the Settings application is to press the "Windows + I" key combination together and call the application directly.
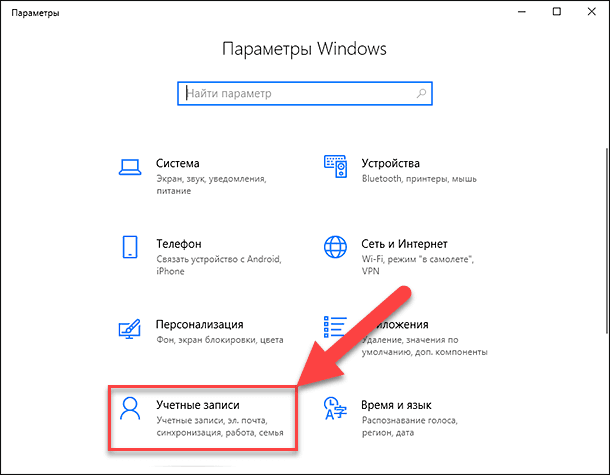
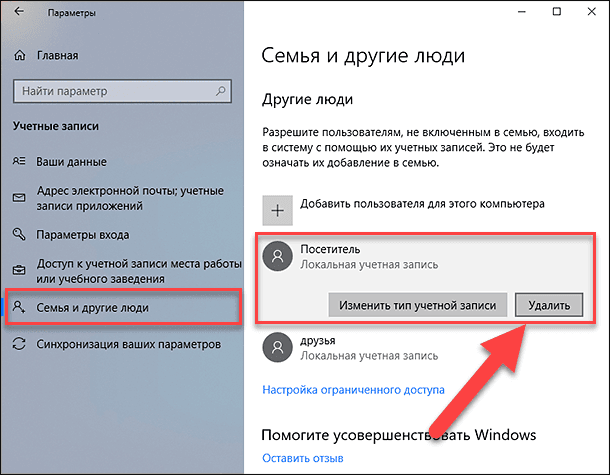
Select the Accounts page from the list of available application pages. In the left pane, go to the "Family and other people" section , and in the right pane of the window, use the scroll bar, lower the slider down and select the "Visitor" account, then click the "Delete" button.
In the pop-up message, click the “Delete account and data” button and complete the process of deleting a user account.
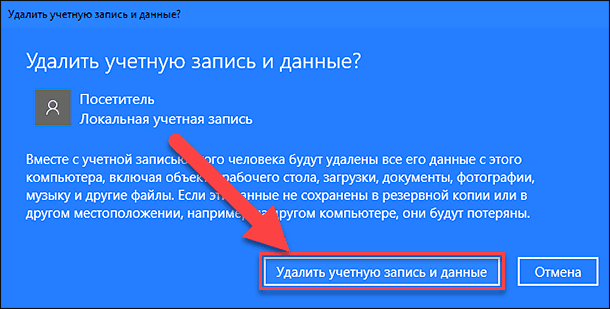
Now the local guest user account "Visitor" is completely removed from your personal computer.
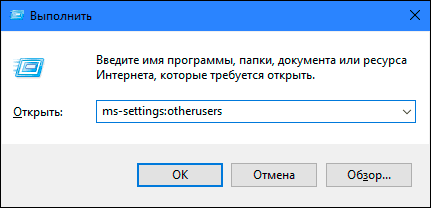
Note : There is also a way to open the “Accounts” page in the “Parameters” application directly using the “Run” dialog box. Open a dialog box (for example, press the key combination “Windows + R” together) and in the command line field enter the command “ms-settings: otherusers” .
For more information on how to access the Run dialog box and a list of all available commands for opening the pages of the Parameters application , see our previously published article: “Some pages or sections are missing from the Settings application in Windows 10” .
OPTION 2: Add a guest account in "Windows 10" through "Local Users and Groups"
This option to create a guest account is only suitable for the "Professional" and "Corporate" versions of the Windows operating system.
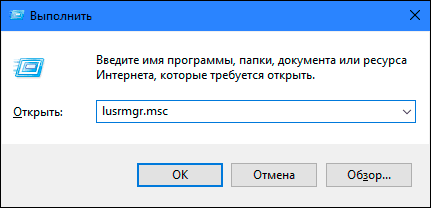
Open the "Run" dialog in any way you like. For example, right-click on the "Start" button located in the lower left corner of the desktop, or press the "Windows + X" key combination together, and in the list of available applications, select the Run dialog box.
Enter the following command in the command line: “lusrmgr.msc” , and click “OK” or press “Enter” to enter “Local users and groups” .
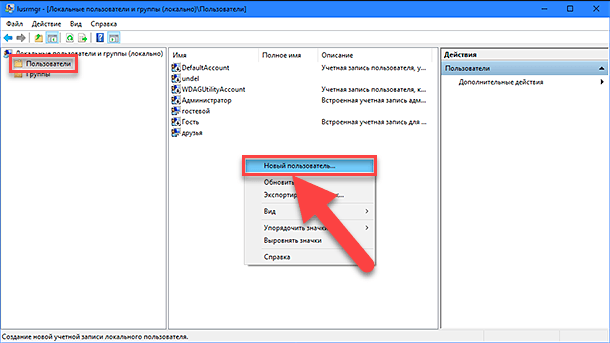
In the left pane of the window, select the Users section , go to the central panel, click on any empty space of the window with the list of available users, and in the pop-up menu, select the New User ... section .
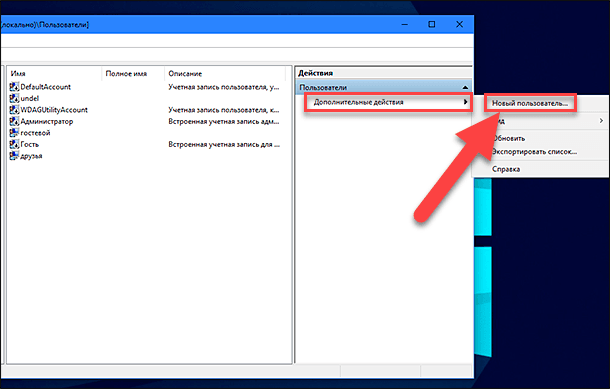
Or select the section of the same name in the right pane of the window that appears in the pop-up menu when you click on the "Additional actions" section .
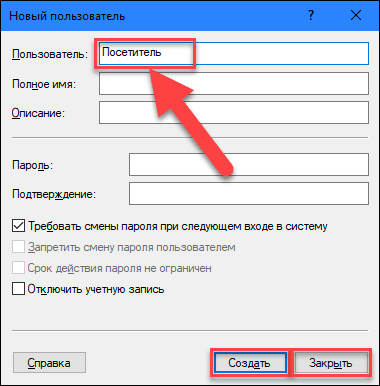
In the window for creating a new local user account, enter a new name in the User cell (in our example we chose the name Visitor ), click the Create and Close buttons to complete the account creation process (you can leave out the remaining fields ).
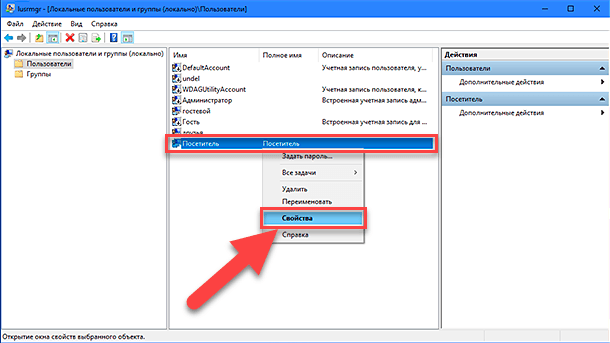
In the central pane of the window, in the list of users, select the newly created “Visitor” entry and double-click on it, or right-click on it, and select the “Properties” section in the pop-up menu.
In the window that opens, go to the “Group Membership” tab, select the Users group in the central window and click the Delete button.
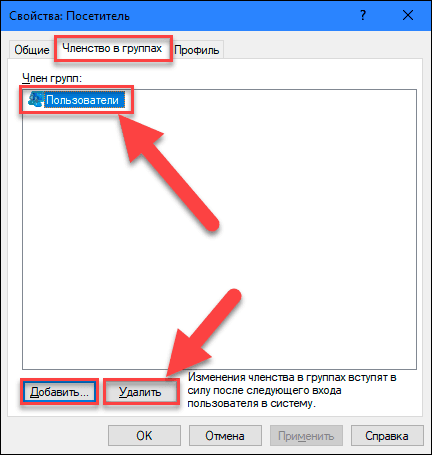
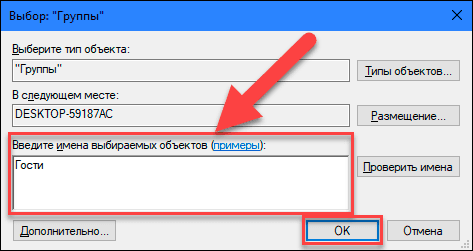
Upon completion of the removal process, click the Add button and open the Select: Groups window. In the field “Enter the names of the objects to be selected” type the value “Guests” (for the English version of the operating system “Windows” type the value “Guests” ) and click the button “OK” to save.
Then click the “Apply” and “OK” buttons to apply the changes. All the necessary steps to create a local guest account have been completed and you can close the "Local Users and Groups" window.
Now, as in the first option, third-party users can use your personal computer with your permission under the local guest user account "Visitor" . When first logging in with a new account, it will take some time to configure the new user login settings.
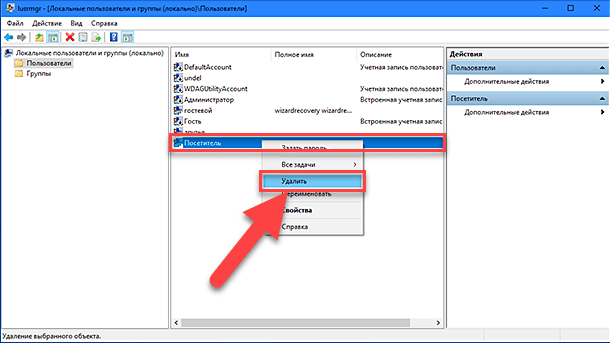
In the event that the need for this account disappears, you can easily delete it. Right-click on this entry and select the “Delete” section in the pop-up menu. Or simply press the "Delete" key on the keyboard.
In the pop-up warning window “Are you sure you want to delete the user account Visitor?”, Click the “Yes” button or press the “Enter” key on the keyboard and complete the deletion process.
So, we have described to you two possible options for creating a limited guest user account on your personal computer. Leave us your comments on the topic: “Should Microsoft return the original guest account to the Windows 10 operating system?” . We will always be happy to hear your opinion and discuss this issue with you.